How to Build a Retaining Wall on Slope: A Complete Step-by-Step Guide for Stability and Style
- Mar 28
- 18 min read
Updated: May 1
Building a retaining wall on a slope in South Carolina may seem daunting, but with the right approach, you can create a stable, durable structure that prevents soil erosion and transforms your sloped yard into usable, attractive outdoor space.
The key is careful planning, proper base preparation, selecting the right materials, and installing effective drainage.
Whether you're tackling a small retaining wall or a more complex project on steep terrain, this guide will walk you through each step to ensure your wall stays stable and lasts for years.
Key questions this article addresses:
How do you plan and measure for a retaining wall on a slope?
What materials are best suited for sloped retaining walls?
How do you prepare the site and build a stable base on uneven ground?
What drainage solutions prevent wall failure and soil erosion?
When is professional help necessary for building retaining walls on slopes?
How do you maintain a retaining wall to ensure long-term durability?
Key Takeaways
A retaining wall on a slope controls erosion, manages water runoff, and transforms unusable terrain into functional level areas for patios, gardens, or play spaces. These structures work by counteracting the lateral pressure soil exerts as gravity pulls it downhill.
Walls up to about 3–4 feet can often be tackled as DIY projects using modular blocks, but anything taller, curved on steep grades, or located near structures should involve an engineer and require permits in most jurisdictions.
The three most critical elements for success are a deep, compacted gravel base, a perfectly level first course, and a well-designed drainage system using perforated drainage pipe, gravel, and landscape fabric.
Stepped or terraced walls work better than a single tall wall on sharp slopes of 30–35% or more, distributing pressure and reducing the engineering complexity of each individual structure.
This article walks through planning, permits, excavation, base building, wall construction, drainage, finishing, and ongoing maintenance, plus clear guidance on when to call professionals.
Why Build a Retaining Wall on a Slope?
If you’ve ever watched soil slowly creep down your sloped yard after heavy rain in Lexington, SC, you understand the frustration of fighting gravity. Between 2020 and 2024, increasingly intense rainstorms have accelerated erosion problems for homeowners across North America, turning manageable grades into mudslides that threaten foundations, walkways, and landscaping investments.
A retaining wall holds back soil by absorbing and redistributing the lateral pressure that builds as earth attempts to slide downhill. Beyond preventing soil erosion, these structures slow surface runoff, protect patios and basements positioned downslope, and create opportunities to reclaim unusable space. The wall essentially acts as an engineered barrier that works with your landscape rather than constantly battling it.
Perhaps the most compelling reason to build a retaining wall is the transformation of wasted terrain into functional outdoor space. A typical suburban yard with a 20–30% slope offers limited options—too steep for a comfortable seating area, too unstable for a vegetable garden, too awkward for children’s play equipment. A well-designed wall changes that equation entirely.
Consider this practical example: a 6-foot total grade change converted into two 3-foot terraced retaining walls creates a flat 10-foot-deep seating area between them. What was once an erosion-prone hillside becomes a destination patio with natural separation from the upper and lower yard. This kind of usable space improvement can increase property value by 10–20% according to industry estimates.
The aesthetic appeal shouldn’t be overlooked either. A sloped yard with visible erosion channels and patchy grass doesn’t present well. A thoughtfully designed block retaining wall or natural stone structure adds architectural interest while solving the underlying soil stability issues that make maintenance frustrating.
Planning a Retaining Wall on a Slope
Investing time in planning during early 2026 saves significant cost and rework once you’re moving dirt. Rushed projects on slopes frequently result in walls that lean, crack, or fail entirely within a few years—problems that cost far more to fix than to prevent.
Start by measuring the total height of your slope. Use a 4-foot level attached to a straight 2x4 or a laser level to calculate vertical rise over the horizontal distance where the wall will go. Plant the board at the bottom of the slope, level it, then measure from the bottom of the board to the ground at the uphill end. Repeat this process across the entire planned wall length to understand how the grade changes.
With your measurements in hand, determine your desired finished wall’s height. For DIY projects, 2–3 feet is the sweet spot—tall enough to be meaningful, short enough to remain manageable without engineering. If your slope rises more than 4 feet total, consider whether multiple terraced walls make more sense than a single tall structure. On slopes of 30–35% or steeper, terracing is almost always the better approach.
Block quantity calculations follow a straightforward formula:
Divide total wall length by one block length to get blocks per course
Multiply by the number of courses needed (including the buried base course)
Add approximately 10% for cuts and breakage
For example, a 24-foot wall using 12-inch-long blocks needs 24 blocks per course. If you’re building 4 courses high (including one buried), that’s 96 blocks, plus 10% brings you to about 106 blocks.
Different wall types suit different slope conditions. Gravity segmental block walls work well for heights up to about 3–4 feet without reinforcement. Geogrid-reinforced retaining wall systems handle taller builds by extending stability into the slope itself. Poured concrete and cantilever walls should be left to professionals—the engineering requirements and failure risks don’t suit weekend projects.
Choosing Materials for a Sloped Retaining Wall
Material choice directly affects strength, cost, and appearance on a sloped site. The right selection depends on your wall’s height, your soil conditions, and how much effort you’re willing to invest in construction.
Segmental concrete blocks represent the best option for most DIY builders tackling 2–4 foot walls. These retaining wall block systems feature interlocking lips or pins that create shear strength between courses. They’re relatively lightweight to handle individually, stack predictably, and cost roughly $20–50 per square foot installed. With proper drainage, expect 50+ years of service life.
Natural stone delivers unmatched aesthetic appeal and works beautifully on slopes where you want a rustic look. However, friction-based stability requires more skill to achieve than interlocking block systems. Labor costs run higher ($30–60 per square foot), and without proper footings, stone walls are vulnerable to frost heave in cold climates. Best suited for walls under 3–6 feet where appearance justifies the extra effort.
Pressure-treated timber or railroad ties offer budget-friendly construction at $15–30 per square foot. The catch? Wood rots within 15–20 years, even with treatment. These materials suit temporary solutions or low-load applications under 4 feet, but they’re not ideal for long lasting retaining wall construction on slopes where soil pressure is already elevated.
Cast-in-place concrete provides monolithic strength for engineered walls up to 15 feet, incorporating rebar for tension resistance. This material suits professional installation for heavily loaded or tall walls but requires forms, curing time, and expertise beyond typical DIY scope.
Your soil type significantly influences material choice. Clay-heavy soils expand and contract with moisture changes, demanding deeper footings and potentially geogrid reinforcement. Sandy soils drain better but may require wider bases for stability. High groundwater situations call for aggressive drainage regardless of wall material.
When selecting blocks, choose products specifically marketed for retaining walls—not decorative garden edging. Retaining wall blocks are engineered with greater mass and interlocking features designed to handle lateral pressure. The difference matters when thousands of pounds of wet soil push against your structure.
Material | Max DIY Height | Cost per Sq Ft | Lifespan |
Segmental blocks | 3–4 ft | $20–50 | 50+ years |
Natural stone | 3–6 ft | $30–60 | 75+ years |
Timber | Under 4 ft | $15–30 | 15–20 years |
Poured concrete | Professional only | $25–40 | 50+ years |
Check Codes, Permits, and Engineering Requirements
Many North American municipalities require permits for retaining walls over 3–4 feet, especially on slopes. Skipping this step can result in forced demolition, fines, or liability issues if your wall fails and affects neighboring properties.
Contact your local building department and HOA before ordering materials. Ask specifically about height limits, setback requirements from property lines, and whether walls near driveways or structures trigger additional review. Some jurisdictions measure wall height from the bottom of the footing; others measure only the exposed face. The distinction matters for permit thresholds.
Walls over about 4 feet of exposed height, or any wall supporting a driveway, building foundation, or steep 30–35% slope, often must be designed or stamped by a structural engineer. This isn’t bureaucratic overhead—it’s recognition that soil can exert hundreds of pounds per square foot of pressure, and failures involving that much force cause serious damage.
Before digging anywhere, call 811 (in the U.S.) or your local utility-locating service. Gas lines, electrical conduits, and fiber optic cables may run through your slope at unexpected depths. Most services require a few business days’ notice, so factor this into your project timeline.
When to absolutely involve an engineer:
Wall height exceeds 4 feet
Slope grade exceeds 30–35%
Wall supports or is near a driveway, garage, or home foundation
Tiered walls with less than twice the lower wall’s height in horizontal spacing
Expansive clay soils or high water table
Wall sits near property lines in jurisdictions requiring setbacks
Tools and Materials You’ll Need
Having everything on site before you start prevents frustrating delays on sloped projects where staging and access are already tricky. A trip to the supply yard mid-project means losing momentum and potentially leaving an unsecured excavation overnight.
Essential tools include a shovel and trenching spade for excavation, a wheelbarrow for moving materials, a hand tamper or plate compactor for base preparation, a 2–4 foot level, mason’s line with a string line level or laser level for establishing grades, tape measure, circular or masonry saw with a diamond blade for cutting blocks, rubber mallet for adjustments, and safety gear including gloves, goggles, ear protection, and steel-toe boots.
Core materials include retaining wall blocks in your chosen style, crushed stone or road base (typically 3/4-inch minus) for the footing and backfill, a perforated 4-inch drain pipe with fittings, landscape fabric to separate drainage gravel from native soil, clean drainage gravel, PVC or corrugated discharge pipe to daylight the drain, construction adhesive for securing cap blocks, and geogrid if your wall system specifies it for added reinforcement.
Buy about 10% extra blocks and caps to account for cuts, breakage, and future repairs. If your calculation shows 200 blocks needed, order 220. The cost of storing a few extra blocks is negligible compared to waiting for a special order when you’re three courses from finishing.
Step-by-Step: How to Build a Retaining Wall on a Slope
This section provides a chronological build process for a sloped yard where the wall “steps up” with the grade. Unlike building on flat ground, slope construction requires terracing your base trench so each block course sits on level, compacted material rather than following the raw ground angle.
The examples use typical residential dimensions: a 2.5–3 foot high wall on a 25–30% backyard slope. Adjust quantities and dimensions based on your specific site conditions and your retaining wall design requirements.
Step 1: Assess the Site and Mark the Wall Line
Walk the slope after a rain to observe natural water paths and identify soft spots in the soil. These observations inform where drainage is most critical and whether any areas need over-excavation and stabilization.
Stake out the front face of the wall using wooden stakes and mason’s line along the base of the slope where the lowest part of the wall will start. This reference line should be level (use a line level or laser level to verify), even though the ground below it slopes away.
Mark wall curves or corners with a garden hose or marking paint. Adjust your layout to avoid large tree roots, which can heave blocks over time, and maintain clearance from any utilities marked by the locating service.
For a straight 20-foot wall, you might use stakes every 6–8 feet with mason’s line pulled taut between them. Curved walls need more frequent reference points to maintain smooth arcs.
Step 2: Excavate and Create Stepped Footings
For most small DIY walls, the base trench should be about 12–16 inches wide and deep enough so the first block course is buried at least 4–6 inches below final grade at the lowest point. This embedment depth prevents the wall from sliding forward under pressure.
On a slope, you’ll cut into the hill to form a series of short “steps” in the trench rather than digging one continuous angled channel. Each step should equal one block height, allowing the wall to climb the grade while every course remains level. Think of it as building a staircase for your foundation.
Remove all topsoil, roots, and organic material down to firm subsoil. Organic matter decomposes and settles, creating voids that undermine your base. Check for soft spots by probing with a piece of rebar—if it sinks easily, over-excavate and fill with compacted gravel to create a solid base.
Stockpile excavated dirt uphill or away from trench edges. On steeper slopes, loose soil staged too close to your excavation can slide back in, wasting effort and creating safety hazards.
Step 3: Install and Compact the Base
Add 4–6 inches of crushed stone or road base to the trench. For walls approaching 4 feet or where local code specifies deeper preparation, increase this to 6–8 inches. This crushed gravel layer provides drainage beneath the wall and distributes load across a wider area than blocks alone.
Compact the base material in 2-inch lifts using a hand tamper or plate compactor. Pay extra attention at step transitions where the wall will change level—these joints are stress points where settling causes the most visible problems. Each lift should feel solid underfoot after compaction.
Check the compacted base with a level both front-to-back (perpendicular to the wall face) and side-to-side along each step. Low spots should be corrected with additional gravel and re-compaction, not by adjusting blocks on an uneven surface.
Pro tip: A stable base is especially critical on a slope. While flat-ground walls might tolerate minor base imperfections, slopes amplify every error. Gravity constantly pulls at the retained soil, and any wall tilt increases over time if the foundation wasn’t right from the start.
Step 4: Lay the First Course of Blocks
Place the first course of retaining wall blocks on the compacted base, starting at the lowest point of the wall. This establishes your reference elevation from which all other courses will step up.
Level each first block front-to-back and side-to-side, tapping gently with a rubber mallet and adjusting the base gravel as needed. Perfection matters here—any deviation in the first row compounds through subsequent courses. Take twice as long on this step as you think you need.
When the ground rises enough for one block height (based on your stepped trench), cut into the slope and start the next section of the base course one full block higher. The tops of blocks in both sections should remain level with each other when measured across the step.
Maintain tight joints between blocks and align faces to your string line. A 20-foot long first course using 12-inch blocks requires about 20 blocks, but this number increases where steps occur since you’re essentially starting new “first courses” at each elevation change.
Step 5: Add Drainage Pipe and First Backfill Layer
Lay perforated drain pipe directly behind the first course at the base, with perforations facing down. Slope the pipe at approximately 1 inch per 10 feet toward a safe daylight outlet (where water exits onto a lower slope or into a dry well).
Wrap the pipe in landscape fabric or use sock-wrapped pipe to prevent silt infiltration, especially important with clay or fine soils that can clog perforations within a few seasons. Proper drainage prevents the water buildup that causes 80% of retaining wall failures.
Backfill behind the first course with 3/4-inch clean gravel up to about mid-height of where the second row will sit. This creates the beginning of your drainage zone. Native soil can fill the space further back from the wall face, but the area immediately behind the blocks needs free-draining material.
On a stepped slope, the drainage pipe will also step up with the wall. Long or tall runs may require additional outlets to prevent water from backing up at step transitions. Plan for outlet locations during site preparation to avoid difficult retrofits.
Step 6: Build Additional Courses and Step the Wall Up the Slope
Stack each new course of blocks with staggered joints (running bond pattern), offsetting vertical joints by at least one-third of the block length. Clean debris from the course below before placing new blocks—trapped dirt prevents proper seating and creates stress points.
Engage any built-in lips or interlocking features according to the manufacturer’s instructions. Most retaining wall systems incorporate a slight setback (typically 1 inch per course) so each row leans slightly back into the slope. This batter helps resist overturning forces.
When your base trench rises one block height at a step transition, continue building upward from the lower section while starting the base course at the new higher elevation. The courses will merge as the lower section climbs to meet the stepped-up base.
For walls above 3 feet or as specified by your block system, install geogrid layers between courses. Roll the grid back into the slope at lengths specified by the manufacturer—typically 50–100% of wall height. A 24-foot wall where the slope causes two step-ups might require geogrid at courses 3 and 5, extending 3 feet back into the retained soil.
Step 7: Continue Backfilling and Compacting Behind the Wall
Backfill behind the wall in 6–8 inch lifts. Place drainage gravel directly behind the blocks and native soil further back toward the original slope surface. This layered approach balances drainage needs with soil stability.
Compact each lift of soil with a hand tamper, keeping heavy plate compactors at least 3 feet away from the back of the wall. Equipment vibration too close to fresh construction can push blocks outward before backfill fully locks them in place.
Maintain a column of free-draining gravel at least 12 inches thick immediately behind the wall from bottom to top. Separate this gravel backfill from native soil using landscape fabric to prevent soil from migrating into drainage spaces and clogging them over time.
On steep slopes, consider making the drainage zone slightly wider—perhaps 18 inches—to handle greater water volumes during intense storms. The extra gravel cost is minimal insurance against improving drainage capacity.
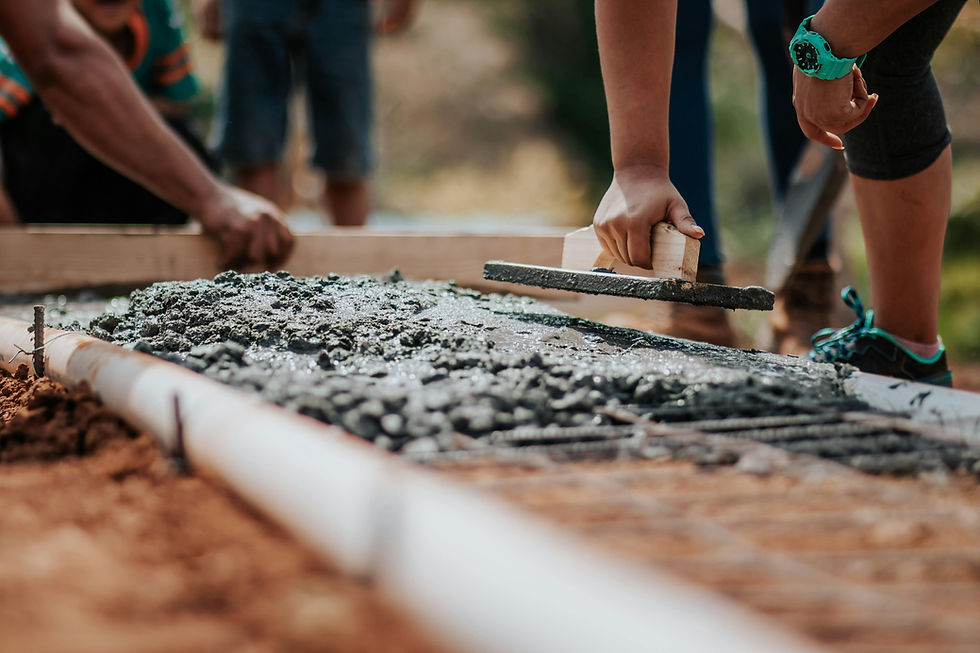
Step 8: Install Cap Blocks and Final Grading
Place cap stones or cap blocks along the top course, cutting to fit corners or curves. Secure caps with outdoor-rated construction adhesive applied in a serpentine pattern for good coverage without squeezing out at joints.
Grade the soil above and behind the wall to slope gently away from the blocks. Surface water should drain away from your wall, not toward it. A 1–2% slope (1–2 inches drop per 10 feet) is sufficient to direct water runoff without creating erosion.
Add topsoil, mulch, and plantings above the wall to further stabilize the retained slope and improve appearance. Deep-rooted perennials, groundcovers, or shrubs bind soil with their root systems, reducing erosion by 50–70% compared to bare soil. Consider adding plants that thrive in your climate and don’t require excessive watering that could saturate soil behind the wall.
On terraced walls, the newly level areas between structures create opportunities for paths, pavers, or small deck platforms. These additions complete the transformation from unusable slope to functional outdoor space.
Common Mistakes to Avoid on Sloped Sites
Slopes add extra stress to retaining walls, making typical DIY errors more serious than they’d be on flat ground. The same mistakes that cause minor settling on level terrain can trigger complete wall failure when gravity and soil pressure compound the problem.
Insufficient base depth or width on the downhill side is the most common oversight. Builders dig to a uniform depth without accounting for the slope, leaving the downhill portion of the wall perched on inadequate foundation. The base should always reference the final grade at the lowest point.
Skipping compaction during base preparation or backfilling creates settlement that manifests as leaning or bulging within the first few years. Each 2-inch lift needs thorough compaction—not just a few taps with a hand tamper.
No drain pipe or inadequate gravel behind the wall allows hydrostatic pressure to build during heavy rain. Water-saturated soil can exert 2–3 times the pressure of dry soil. Industry data shows 62% of wall failures trace directly to water-related issues.
Building a single tall wall instead of terracing on slopes exceeding 30% concentrates all the soil pressure at one structure. A 6-foot wall experiences exponentially more force than two 3-foot walls would separately.
Not battering the wall back into the slope ignores the physics of retained soil. Walls should lean slightly into the slope (most block systems build this in automatically), reducing overturning moment by 20–30%.
Consider this example: a 5–6 foot wall built in 2018 without drainage bulged and cracked within two winters. Freeze-thaw cycles expanded water trapped behind the wall, and hydrostatic pressure during spring thaw exceeded what the unbattered structure could resist. Proper drainage and terracing would have cost perhaps $500 more initially but prevented a $4,000 rebuild.
Avoid relying on landscape timbers alone for tall slopes—wood rots and creeps under sustained pressure. Similarly, plain cinder blocks lack the mass and interlocking features needed for true retaining wall systems.
Maintenance Tips for a Long-Lasting Retaining Wall
Even high quality retaining walls on slopes need periodic attention, especially after heavy rain or spring thaws when soil movement peaks. Regular maintenance catches small issues before they become expensive problems.
Inspect your wall at least once or twice annually for bulging, leaning, open joints, blocked drain outlets, or erosion at the base. Walk the entire length and look for any visible changes from your last inspection. Minor shifts in the first year sometimes correct themselves with settling, but progressive leaning warrants professional evaluation.
Keep drain outlets clear of leaves, mulch, and sediment so water can escape freely downhill. Clogged drainage is the fastest path to wall failure. Consider installing a small grate or screen over outlets to reduce debris accumulation while still allowing water flow.
Promptly regrade any low spots above the wall where water collects and ponds. Standing water saturates soil and increases pressure on the wall. Patch eroded areas with compacted soil and establish vegetation to prevent recurring problems.
Seasonal maintenance checklist:
Spring: Clear drain outlets, inspect for winter damage, check for new cracks
Summer: Monitor during heavy rain, verify water exits properly at outlets
Fall: Remove leaves from drainage areas, final pre-winter inspection
Winter: After thaw cycles, walk the wall looking for new movement
Minor movement noticed within the first year can sometimes be corrected by adding backfill and re-compacting. However, if a tall wall shows 1–2 inches of outward lean, consult a professional rather than attempting DIY repairs that might make things worse.
When DIY Is Feasible vs. When to Hire a Professional
Slope angle, wall height, soil type, and what sits above the wall all determine whether DIY is realistic or whether expert installation makes more sense. Honest assessment upfront prevents mid-project discoveries that require expensive professional intervention.
Typical DIY scenarios include straight or gently curved segmental block walls under 3–4 feet tall on modest slopes (under 25–30%), not supporting driveways, garages, or large structures. If your wall fits this description and you’re comfortable with careful planning, physical labor, and following manufacturer specifications, you can likely handle the project.
Professional installation or engineering becomes strongly recommended for walls over 4 feet, walls on or below 30–35% slopes with heavy wet clay, tiered walls with less than twice the lower wall’s height in horizontal spacing, or walls near property lines and foundations. These situations involve forces and failure consequences beyond typical homeowner experience.
Many jurisdictions mandate engineered plans when combined height of terraced walls exceeds a specified limit (often 6–8 feet total) or when public pathways, sidewalks, or neighboring properties sit below the slope. Even if not legally required, complex projects benefit from professional design that accounts for specific soil conditions and drainage needs.
If you’re uncertain how your slope and soil type affect the design, consult a professional during planning rather than after problems emerge. Many contractors offer initial consultations that can confirm your DIY approach is sound or identify issues you hadn’t considered. That $200–400 consultation might save $5,000 in rebuilding costs.
FAQ
This FAQ section addresses common slope-specific concerns not fully covered in the step-by-step instructions, focusing on practical questions homeowners planning 2024–2026 projects frequently ask.
How steep is too steep for a DIY retaining wall on a slope?
Slope percentage is calculated as rise divided by run, multiplied by 100. A slope that rises 2 feet over 10 horizontal feet is a 20% slope; 3 feet over 10 feet is 30%; 4 feet over 10 feet is 40%.
Gentle to moderate slopes (up to roughly 25–30%) are generally manageable for a single low DIY wall, assuming decent soil conditions and proper drainage. At these grades, lateral pressure remains within what well-built segmental block systems handle without reinforcement.
On very steep slopes (around 35% and above), building multiple terraced walls or involving a professional and potentially an engineer is usually safer. The forces involved increase dramatically with grade, and failure consequences become more severe. Local codes may further restrict what can be done without engineered design on aggressive slopes.
How long does it typically take to build a retaining wall on a slope?
A small 20–25 foot long, 2–3 foot high wall might take a weekend for two reasonably handy people working full days. A 50-foot long stepped wall could extend to several days or a full week of after-work sessions.
Excavation and base preparation typically consume at least half the total project time on slopes. You’re moving more soil, creating stepped footings, and spending extra effort on compaction compared to flat-ground construction.
Weather, soil conditions (rocky ground versus easy digging), and access for delivering gravel and blocks significantly affect schedules. Plan buffer time for unexpected issues like hidden roots, encountering utilities, or rain delays that make excavation impractical.
What does it cost to build a retaining wall on a slope?
For DIY construction, typical segmental block walls run approximately $20–35 per square foot of wall face for materials on moderate slopes. This includes blocks, base material, drainage gravel, perforated pipe, landscape fabric, and caps. Steeper slopes increase costs due to more excavation, additional drainage materials, and potentially geogrid.
Professionally built walls range from about $40–70+ per square foot depending on region, site access, wall height, and complexity. Complex projects involving engineering, specialized equipment for steep access, or premium materials can exceed this range.
Get at least two local quotes for professional work on anything above 4 feet or on sharp slopes. Prices vary significantly by region and contractor availability.
Can I build steps or stairs into a retaining wall on a slope?
Integrating steps is common on sloped yards to connect lower and upper levels, but requires careful planning of riser height (typically 6–8 inches) and tread depth (at least 10–12 inches) for comfortable, code-compliant use.
Many retaining wall block manufacturers offer special stair blocks or modular step units designed for compatibility with their wall systems. These products simplify construction while ensuring adequate strength at high-traffic transition points.
Note that stairs concentrate foot traffic and load, so proper base preparation, drainage beneath treads, and potentially handrails (if code requires) must be considered. Complex stair-wall combinations on steep slopes or serving primary home access are best designed or reviewed by a professional rather than improvised on site.
How do freezing temperatures affect a retaining wall on a slope?
In cold climates with freeze-thaw cycles, water in soil and base materials expands and contracts seasonally, pushing on walls and lifting poorly constructed bases. This frost heave can cause 1–2 inches of movement per year in severe cases.
Use non-frost-susceptible, well-draining crushed stone for the footing and backfill. Bury the base below local frost depth (typically 36–48 inches in northern climates) when required for taller or engineered walls. The deeper foundation prevents the wall from riding upward on frozen soil beneath it.
Good drainage becomes even more critical on slopes in freezing regions. Water trapped behind the wall expands when frozen, generating enormous pressure that can crack blocks or push sections outward. Perforated drainage pipe and ample gravel backfill are essential, not optional, in these climates.
Don’t Leave Your Landscape to Chance
If the thought of trenching, leveling heavy blocks, and calculating drainage pipes feels overwhelming, let the professionals handle the heavy lifting. At CDA Performance Construction, we specialize in turning unstable slopes into functional, beautiful outdoor living spaces.
Why homeowners in Lexington and the Midlands trust us:
Local Expertise: We understand South Carolina’s unique soil conditions and drainage requirements.
Structural Integrity: From deep footings to high-quality geogrid reinforcement, we build walls that stand the test of time.
End-to-End Service: We handle everything from the initial site grading and permits to the final finishing touches.
Custom Design: Whether you want the sleek look of concrete or the timeless appeal of interlocking pavers, we match your home’s style perfectly.
Ready to reclaim your backyard? Don't let a sloping yard limit your property's potential. Contact CDA Performance Construction today for a free, no-obligation estimate. Our team is ready to provide the stability your land needs and the style your home deserves.