How to Build Paver Stone Patio: The Ultimate DIY Guide for a Stunning Outdoor Space
- Mar 26
- 16 min read
Updated: May 1
Building a stunning paver stone patio is easier than you might think! With the right prep work, tools, and materials, you can create a durable, attractive outdoor living space in just a weekend.
This DIY guide walks you through each step—from excavation and base preparation to laying patio pavers and finishing touches—so you can confidently transform your backyard with a professional-quality patio that lasts for years.
For expert help cutting, laying, and treating stone patios in Lexington, South Carolina and the surrounding area, reach out today for your estimate on CDA Performance Construction’s top quality work!
Key Questions This Article Will Answer:
What materials and tools do I need to build a paver stone patio?
How deep should I excavate and prepare the base for lasting stability?
What is the best way to lay and pattern the pavers for a great look?
How do I ensure proper drainage and slope for my patio?
What techniques lock the pavers in place and prevent weed growth?
How do I maintain and care for my paver patio to keep it beautiful?
Key Takeaways
A typical 12’ x 16’ paver stone patio can be completed over a focused weekend with basic DIY skills and rented tools like a plate compactor.
Proper excavation (usually 8–10 inches deep) and thorough compaction of a gravel base are the most critical steps for a patio that lasts 25+ years.
A gentle slope of about 1/4” per foot away from the house is essential for drainage and preventing water damage to your foundation.
Edge restraints and polymeric sand are what keep the entire patio locked together and low-maintenance for years to come.
Planning your layout to minimize cuts (using a simple running bond or stacked pattern) saves time, money, and frustration on installation day.
Introduction: Why Build a Paver Stone Patio?
A paver stone patio can transform an unused patch of lawn into a 192 square foot outdoor living space perfect for grilling, entertaining, or simply enjoying your morning coffee. Whether you’re picturing a cozy bistro setup or a full dining area with a fire pit, this project puts that dream within reach of any motivated homeowner with a free weekend.
Unlike poured concrete, a paver patio offers better aesthetics, easier spot repairs, and significantly less risk of large cracks in freeze-thaw climates common throughout the Midwest and Northeast. If a single paver shifts or cracks years ago from heavy use, you simply lift it out and drop in a replacement—no jackhammers required.
This guide focuses on a DIY, ground-level patio using concrete pavers or natural stone, built on a traditional gravel and sand base without any concrete slab underneath. For 2025, you can expect to complete a 12’ x 16’ diy paver patio over one weekend for around $1,200–$1,800, depending on your paver choice and tool rentals. The following sections walk you through step-by-step instructions, complete tool and material lists, layout tips, and finishing ideas so you can follow along from start to finish.
Planning Your Paver Stone Patio
Good planning on day one saves digging, hauling, and frustrating re-work later. Before you order a single bag of sand or rent any tools, spend time thinking through exactly where your patio will go and how large it needs to be.
Choosing the Right Location
Your patio location should make sense for how you’ll actually use the space. Consider placing it close to a back door for easy access from the kitchen, adjacent to an existing deck, or in a sunny corner of your flat yard where you can catch afternoon rays. Keep at least 4–6 feet of clear walking space between doors and your planned seating area so traffic flows naturally.
Think about sight lines from inside the house too. Position the patio area where you can see it from the kitchen window, and you’ll find yourself using it more often.
Sizing Your Patio
Match your patio dimensions to your intended use:
Patio Size | Best For | Typical Furniture |
10’ x 10’ (100 sq ft) | Small bistro set, grill pad | 2-person table, small grill |
12’ x 16’ (192 sq ft) | Dining area plus grill | 4-6 person table, full grill |
16’ x 20’ (320 sq ft) | Multiple zones | Dining, fire pit, lounging |
For most backyard entertaining, a 12’ x 16’ rectangle hits the sweet spot—enough space for a dining table, a grill station, and room to move around comfortably.
Sketching Your Layout
Grab some graph paper or a free design app and sketch your house walls, back doors, property lines, and where you want the patio. Mark existing features like trees, garden beds, or utility boxes. Then draw in your planned furniture placement to confirm everything fits with enough space around it.
This sketch becomes your reference when you start digging, so take it seriously.
Code and Utility Considerations
Before any dirt moves, handle two critical tasks:
Check local building codes for setback rules and permit requirements (more on this in the FAQ section)
Call 811 at least several days before digging to have gas, electric, and water lines marked
Hitting a buried utility line turns a weekend project into a nightmare. The 811 call is free and takes minutes.
Choosing Your Pattern
Simple patterns minimize cutting and frustration:
Running bond: Pavers offset by half their length, like brick walls—economical with fewer cuts
Stacked bond: Pavers aligned in straight rows and columns—easiest for beginners
Basket weave: Pairs of pavers alternating horizontal and vertical—classic look, moderate cuts
Try to match your patio dimensions to full paver sizes. Standard patio pavers are often 6” x 9” or 6” x 12”, so a 12’ width accommodates full pavers perfectly in many patterns.
Choosing Materials and Tools
Solid base material and the right tools are what separate a patio that shifts and settles from one that stays level for 15+ years. Get your materials delivered a few days early so you’re ready to work.
Paver Stone Options
Type | Cost per Sq Ft | Pros | Cons |
Concrete pavers | $3–$8 | Affordable, uniform, many colors | Can fade over time |
Brick pavers | $5–$12 | Classic look, durable | Heavier, porous |
Natural stone (sandstone, slate) | $10–$25 | Unique appearance, premium feel | Irregular thickness, more cuts |
For a first-time project, concrete pavers offer the best balance of cost, durability, and ease of installation. You can find them at any big-box home improvement store.
Base Materials Checklist
Landscape fabric (also called weed barrier): Heavy-duty, 3-4 oz weight
Crushed stone or crusher run: 3/4” aggregate for the 4–6” base layer
Concrete sand or leveling sand: For the 1” bedding layer
Polymeric sand or poly sand: For filling joints between pavers
Plastic edging or paver edging: With 10” landscape spikes
Essential Tools
You likely own some of these already. For the rest, rent or buy:
Spade and flat shovels
Wheelbarrow
Garden rake and hard rake
Long straight 2x4 (8-10 feet)
Hand tamper or hand tamp for small areas
4-foot level
Rubber mallet
Tape measure (25 feet minimum)
Mason’s line and wooden stakes
Speed square for marking cuts
Chalk line
Push broom
Leaf blower (for cleanup)
Safety glasses and work gloves
Rental Equipment
A rented plate compactor makes compacting your gravel base infinitely easier than using a hand tamper. Expect to pay $75–$150 per day at most equipment rental shops. This is worth every penny—proper compaction prevents settling for decades.
If you need to cut pavers, you can rent a wet saw or use your own circular saw with a diamond masonry blade.
Order Extra Pavers
Calculate your patio area and order 10–15% extra pavers beyond what the math says you need. This covers:
Inevitable cuts at edges
Pavers damaged during handling
Color variations between production batches
Future repairs (store extra pavers somewhere dry)
Having materials delivered saves hours of loading and unloading compared to hauling everything yourself.
Step 1 – Lay Out and Mark the Patio Area
Precise layout now makes every later step—digging, leveling, and installing pavers—much easier. Take your time here and check your measurements twice.
Marking a Rectangular Patio
Start by measuring from your house to establish the patio’s distance from the structure. For a 12’ x 16’ patio, you’ll drive wooden stakes at each corner of your planned perimeter.
Run mason’s string line between the two stakes along one edge, pulled tight and level. Repeat for all four sides, creating a rectangle outline suspended a few inches above the ground level.
Checking for Square
A rectangular patio must have square corners, or your paver rows will angle off frustratingly. Use the 3-4-5 method: measure 3 feet along one string from a corner, 4 feet along the adjacent string, and the diagonal between those points should be exactly 5 feet.
Alternatively, measure both diagonals of your rectangle. When both diagonal measurements match within about 1/2”, your layout is square. Adjust stake positions until they match.
Marking Curves and Irregular Edges
For curved or irregular edges, lay a garden hose in your desired shape, then mark along it with landscape marking paint. You can also use flexible plastic edging staked temporarily as a visual guide.
Accounting for Base Overhang
Mark your dig zone 6–10 inches beyond the string lines on all sides. Your gravel base needs to extend past the final paver footprint to properly support edge restraints and prevent undermining.
Step 2 – Excavation: Digging to the Correct Depth
Most DIY patio failures trace back to one problem: not digging deep enough. Skimping on excavation depth means a thin base, which means settling, shifting, and a surface that looks terrible within a few years.
Calculating Excavation Depth
For a patio in a freeze-thaw region, plan to remove 8–10 inches of soil. This accommodates:
4–6 inches of compacted crushed gravel base
1 inch of leveling sand
2–2 3/8 inches of paver thickness (standard for most patio pavers)
If your ground level and desired finished patio height don’t align, adjust accordingly—but never skimp on that base depth.
Removing Sod and Soil
Use a flat spade to cut sod into strips, then roll them up for disposal or reuse elsewhere. A mattock helps cut through roots and tough soil.
Dig out to the depth your calculations require, extending about 6 inches beyond your string lines. Pile removed topsoil and sod in a designated spot—you’ll use some of it later to backfill around the finished patio and blend edges into your lawn.
Maintaining Consistent Depth
Lay a long straight 2x4 across the excavated surface and place a level on top to check depth consistency. You’re aiming for a relatively flat bottom at this stage, though the actual slope will be established in the next step.
Handling Obstacles
Small buried rocks come out with the shovel. Tree roots under 2 inches in diameter can usually be cut with loppers without harming the tree. But if you hit large roots from major trees, significant rock formations, or anything that looks like a pipe or conduit, stop digging and reassess.
Unknown utilities, major tree roots, or drainage tiles mean calling a professional before proceeding.
Step 3 – Create Proper Slope and Compact the Subgrade
The subgrade—that’s the native soil at the bottom of your excavation—needs both a consistent slope and thorough compaction before any base material goes down.
Why Slope Matters
Water must drain away from your house and off the patio surface. Standing water undermines the base, encourages weed growth, and can damage your home’s foundation over time.
The standard slope recommendation: about 1/4 inch drop per foot of patio length, sloped away from the house or any foundation wall. For a 12-foot-deep patio, that’s 3 inches total drop from the house side to the far edge.
Setting Up Slope Lines
Drive two stakes at the high end (near the house) and two at the low end. Tie string line between them, using a line level to make the strings level initially. Then lower the far-end strings by your calculated drop amount (3 inches for a 12’ run).
These strings become your reference for the entire project going forward.
Compacting the Subgrade
Use a rake to shape the dirt roughly following your string slope references. Then make overlapping passes with your rented plate compactor across the entire area. For very small patios, a hand tamper can work, but it’s significantly more labor.
Compaction eliminates air pockets in the soil that would cause settling later. You want this surface firm enough that your boots barely leave prints.
Final Depth Check
After compaction, re-check depths at multiple points. The soil may have compressed more in some areas than others. Shave down high spots with a shovel so your gravel thickness will be consistent across the whole patio while maintaining that critical slope.
Step 4 – Install Landscape Fabric and Gravel Base
Landscape fabric and a compacted gravel base are the “foundation” that carries the weight of furniture, people, and freeze-thaw cycles. This step takes the most time and effort but determines whether your patio lasts 5 years or 25.
Laying Landscape Fabric
Roll out heavy-duty landscape fabric across your compacted soil subgrade. Overlap seams by 6–8 inches so weeds can’t find gaps. Pin the fabric down with landscape staples every few feet to keep it flat while you work.
This weed barrier prevents weeds from growing up through your patio while still allowing water to drain through.
First Gravel Layer
Spread the first 2–3 inches of 3/4” crushed stone or crusher run over the fabric. Rake it roughly level, following your established slope.
Run the plate compactor across the entire area in overlapping passes. Go slowly—compaction takes time. You should need at least 3–4 passes in different directions.
Second Gravel Layer
Add another 2–3 inches of crushed gravel for a total of 4–6 inches of base material. Level with the rake to follow the slope, then compact again with multiple passes.
After compaction, your gravel base should feel rock-solid. Jump on it—if it gives noticeably, keep compacting.
Checking Base Height
Measure from your string lines down to the compacted gravel surface at several points. Verify that you have consistent space remaining for 1 inch of sand plus your paver thickness. Adjust low spots with more sand and high spots by scraping material away.
Step 5 – Add and Screed the Sand or Stone Dust Layer
The sand layer (or 1/4” chip stone alternative) is a thin, precise leveling bed—not a thick cushion. Keep it to exactly 1 inch.
Setting Up Screed Rails
Place two parallel metal pipes (1” outside-diameter conduit or 1/2” rebar works well) on the compacted gravel, aligned with your slope. Space them about 4–5 feet apart, parallel to each other.
These pipes act as screed rails—guides for creating a perfectly flat surface.
Spreading and Screeding
Pour concrete sand or leveling sand between the rails, slightly overfilling. Using a long straight 2x4, drag it across the tops of both pipes simultaneously. This “screeding” action removes excess sand and leaves a perfectly flat, sloped surface between the rails.
Work in sections. After screeding each section, carefully remove the pipes and fill the channels they leave with sand, smoothing by hand.
Protecting the Surface
Once screeded, your sand bed is precisely leveled. Don’t walk on it. Work from kneeling boards placed on the sand or, better yet, work from areas where you’ve already laid pavers.
Any footprints in the sand will create low spots under your pavers.
Step 6 – Lay the Paver Stones
This is the visible, satisfying part of the project. Careful placement now means straight lines and tight joints that look professional.
Starting the First Row
Snap a chalk line or stretch a mason’s string line along your house foundation (or another straight reference edge) to guide your first row of pavers. This first row must be straight and square—every subsequent row follows it.
Lay your first row of pavers gently onto the sand bed, tight against each other with gaps of no more than about 1/8 inch. Tap each stone with a rubber mallet to set it firmly into the sand.
Following Your Pattern
For a running bond pattern, offset each row by half a paver length from the row before. For stacked bond, align all joints. Whatever pattern you chose during planning, follow it consistently across the patio.
Work from one corner outward. As you lay the pavers, stand or kneel on pavers you’ve already placed, not on the screeded sand.
Checking Alignment
Every 2–3 rows, stand back and visually check your lines. Use your string line to verify straightness. Periodically check that two pavers side by side are level with each other using your 4-foot level.
Small adjustments are easy now—tap pavers with your rubber mallet to nudge them into alignment. Once you’ve laid all the pavers and filled joints, adjustments become much harder.
Working with Heavy Pavers
Natural stone pavers or thick concrete units can be heavy. Having a helper to move and place these prevents back strain and speeds the work. Set aside any chipped or oddly colored pieces—you can use them for edge cuts where imperfections won’t show.
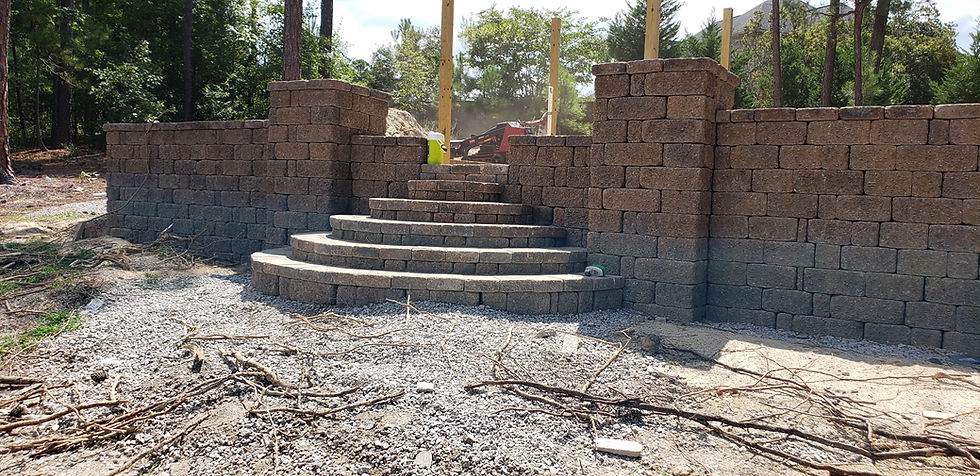
Step 7 – Cut Edge Pavers and Install Edge Restraints
Cutting only happens at the edges where full pavers don’t fit. Good planning keeps cuts to a minimum, but almost every patio needs some.
Marking Cut Lines
Where a full paver meets a curved border or doesn’t quite fit along an edge, hold the paver in position and mark where it needs to be cut using a pencil and speed square. Mark the face of the paver clearly.
Cutting Techniques
For DIYers, three cutting methods work well:
Circular saw with diamond masonry blade: Loud, dusty, but effective for straight cuts. Wet the paver slightly to reduce dust.
Wet saw (rented): Cleaner cuts with water suppressing dust, ideal if you have many cuts.
Manual paver splitter: Works for simple straight breaks on concrete units, no power needed.
Always wear safety glasses and hearing protection when cutting. Stone chips can fly at dangerous speeds.
Placing Cut Pavers
Set your cut pavers to complete the border rows. Check that each sits flush with adjacent full pavers and doesn’t rock. A little extra tap with the rubber mallet should seat them properly.
Installing Edge Restraints
Plastic edging (or aluminum paver edging for curves) installs tight against the outside perimeter of your paver field. Position the edging snug against the pavers, then drive 10-inch landscape spikes through the pre-drilled holes every 8–12 inches.
These edge restraints prevent the entire patio from spreading outward over time—critical for long-term stability.
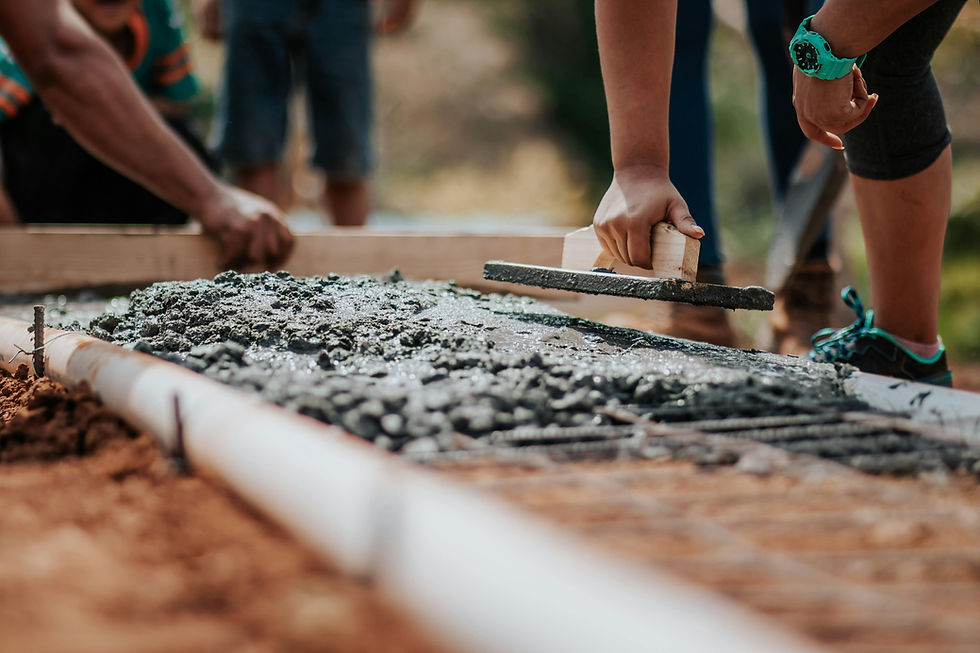
Step 8 – Fill Joints with Polymeric Sand and Compact
Joint sand locks the patio together and helps stop weeds and ant tunnels from forming between pavers.
Sweeping in the Sand
Pour polymeric sand onto the paver surface and sweep it across with a push broom, working it into every joint. Keep sweeping until all gaps are completely filled to just below the paver surface.
Vibrating the Pavers
Run your plate compactor (with a protective rubber pad underneath if possible) over the entire paver surface. This settles the pavers into the sand bed and vibrates the joint sand deeper into the gaps.
After compacting, add sand again and sweep more sand into any joints that sank. Repeat until joints stay full.
Cleaning Before Watering
Before activating the polymeric sand, remove all sand dust from paver faces. Use a leaf blower on low setting or a clean push broom. Any sand film left on top will create a hazy residue when the polymer cures.
Activating the Polymeric Sand
Following the manufacturer’s instructions carefully, mist the patio with a gentle spray in several passes. The water activates the polymers, causing the sand to harden into a solid mass that resists erosion, prevents weeds, and discourages insects.
Allow 24 hours without heavy traffic or rain for the poly sand to fully cure.
Step 9 – Finish Edges and Landscape Around the Patio
Blending your new patio into the yard makes it look intentional rather than “dropped in” from nowhere.
Backfilling Edges
Fill around the outside of your paver edging with leftover topsoil, sloping it gently away from the patio to prevent water from puddling along the edges.
Border Options
Several approaches work well for that transition zone:
Re-seed grass right up to the edge for a clean lawn-meets-patio look
Add a 12–18 inch crushed gravel strip as a maintenance buffer
Plant low perennials and apply mulch for a soft, landscaped transition
Arranging Your Outdoor Space
Now the fun part—arranging patio furniture, positioning your grill, and maybe adding a small fire pit. For a 12’ x 16’ patio, consider:
Dining table and chairs centered on one half
Grill station along the house wall
Two Adirondack chairs facing a small fire pit in the remaining space
Wait at least 24 hours after watering the polymeric sand before placing heavy furniture or firing up that grill.
Optional Upgrades: Sealing, Lighting, and Drainage Add-Ons
These add-ons aren’t required but can elevate your patio’s look and performance.
Sealing Pavers
Paver sealers enhance color, resist stains, and can make cleaning easier. However, sealed pavers require reapplication every 2–3 years, add cost ($200–$400 for a typical patio), and may become slippery when wet.
For most homeowners, sealing is optional—new pavers look great without it.
Simple Lighting
Transform your outdoor living space for evening use with:
Low-voltage path lights along the perimeter (requires transformer and buried wire)
Solar stake lights—no wiring, easy to move
LED string lights attached to posts, a pergola, or the house
Plan conduit runs during base prep if you want to install wired lighting later—it’s much harder to add after the fact.
Drainage Enhancements
For yards that stay wet, consider installing a perforated drain pipe in a gravel-filled trench along the low edge of your patio. Cover with landscape fabric and soil, then plant over it. This channels water away from the patio and into a designated drainage area.
Maintenance Tips for a Long-Lasting Paver Stone Patio
A well-built paver patio mainly needs light yearly maintenance to stay level and attractive for decades.
Routine Cleaning
Sweep leaves and debris every couple of weeks during the season
Rinse away dirt and light stains with a garden hose
Scrub stubborn stains with mild detergent and a stiff brush
Use your leaf blower to clear debris from joints without disturbing the sand
Joint Sand Maintenance
Top up joints with additional polymeric sand every few years if gaps appear from normal movement or erosion. Simply sweep in new poly sand and mist to activate.
Fixing Sunken Areas
If a section settles over time:
Remove the affected pavers (a flathead screwdriver helps pry them up)
Add more sand to the low area and re-level
Compact the sand with a hand tamp
Replace the pavers and re-sand the joints
This kind of spot repair is exactly why pavers beat poured concrete—you fix a small area, not the whole surface.
Seasonal Care
Avoid harsh chemical de-icers that can damage paver surfaces
Use plain sand for winter traction on icy spots
Check edges each spring for signs of movement after freeze-thaw cycles
Pull any weeds that appear in joints before they establish roots
Frequently Asked Questions
Can I lay paver stones directly on dirt?
Laying pavers directly on bare soil is not recommended. Without a compacted gravel base, your patio will settle unevenly, grow weeds through every joint, and shift significantly after just a few freeze-thaw seasons.
At minimum, you need a 4–6 inch compacted gravel base plus a 1-inch sand layer for a stable, long-lasting patio. This applies even for smaller projects like a 10’ x 10’ grill pad—there’s no shortcut that works long-term.
How long does it realistically take to build a paver stone patio?
For two adults working steadily, a 10’ x 10’ patio can often be completed over one long weekend. A 12’ x 16’ patio typically requires 2–3 days total, including excavation.
Having materials delivered in advance and renting a plate compactor significantly reduces project time. Plan heavy digging and base work for day one, then reserve laying pavers and finishing for day two when you’re working on a solid foundation.
How much does a DIY paver stone patio cost per square foot?
For a DIY patio using concrete pavers in 2025, expect roughly $6–$12 per square foot, depending on paver style, base depth, and tool rentals. A 12’ x 16’ (192 sq ft) patio typically runs $1,200–$1,800 total.
Natural stone can raise costs to $15–$25 per square foot but delivers a more high-end appearance. Build a simple spreadsheet with your patio’s dimensions and plug in actual local prices for pavers, crushed gravel, sand, edging, and rentals to get an accurate budget.
Do I need a permit to build a paver patio?
Many municipalities don’t require permits for ground-level, non-roofed patios. However, rules vary widely—some jurisdictions require permits for hardscaping over 200 square feet or within certain distances of property lines.
Call your local building department before starting work. And regardless of permit requirements, always call 811 for utility location at least a few business days before any digging begins.
Can I build a paver patio on a slope?
Gentle slopes can typically be handled by digging deeper into the high side, keeping the finished patio surface level while maintaining consistent base thickness underneath. Your gravel base should remain 4–6 inches thick throughout.
Steeper yards may require building a small retaining wall or creating multi-level terraces, which adds significant complexity. If your grade change exceeds about 6–8 inches across the patio footprint, consider consulting a landscape professional or adding steps between levels.